General Configuration
MoteinoMEGA by LowerPowerLab is designed for use with RFM69 HCW/CW and RFM95/RFM96 LoRa transceivers. MoteinoMEGA is a wireless Arduino based on the Atmel ATMega1284P micro-controller, see complete specification.
- Run Arduino IDE.
- You will need to install the Moteino package in your Arduino IDE.
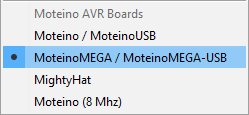
- You should see in menu Tools -> Board the Moteino Mega
- Connect the MoteinoMEGA using any FTDI adapter.
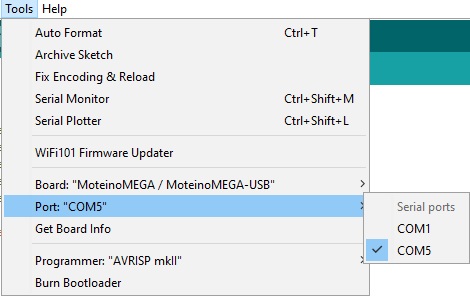
- Check the appropriate COM port which is used for communication with FTDI adapter.
- There is now a programming guide for Moteinos which helps you get started with libraries and programming in Arduino IDE, please check it out if you are new to Arduino.
Temperature Sensor using Moteino MEGA and DS18B20
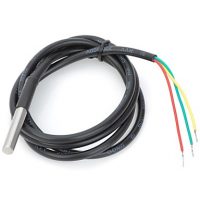
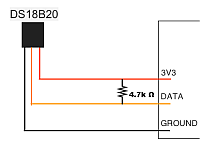
- Connect the one wire temperature sensor ds18b20 to MOTEINO. For data, we can use any of available digital pins, see here
- Use an addition 4.7k resistor between +3.3V and the data line .
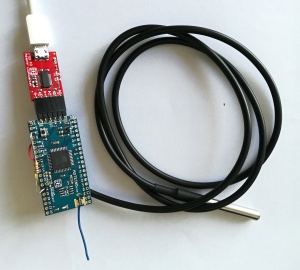
- Everything assembled:
- For communication with ds18b20 we need Library for Dallas/Maxim 1-Wire Chips and Arduino plug and go library for the Maxim (previously Dallas) DS18B20 (and similar) temperature ICs, import them to Arduino IDE
- Check if your MOTEINO can simply read the temperature from a sensor using Arduino IDE simple sketch:
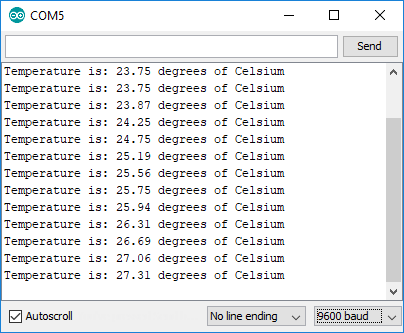
#include <OneWire.h> // load OneWire.h library
#include <DallasTemperature.h> // load DallasTemperature.h library

const int digitalpin = 18; // number of digital pin on MOTEINO, we connected to D18
OneWire oneWireDS(digitalpin); // instance digitalpin from OneWire lib
DallasTemperature sensor(&oneWireDS); // instance sensor from DallasTemperature lib

void setup(void)
{ Serial.begin(9600); // 9600 baud serail communication
sensor.begin(); // start communication with ds18b20
}

void loop(void) {
sensor.requestTemperatures(); // read the temperature from a sensor
Serial.print("Temperature is: ");
Serial.print(sensor.getTempCByIndex(0)); // get a value of the temperature, "0" is unique address of sensor
Serial.println(" degrees of Celsium");
delay(1000);
}
- Use serial monitor,… and it works!
- Within TheThingsNetwork https://thethingsnetwork.org/ we use the LMIC-Library https://github.com/matthijskooijman/arduino-lmic, slightly modified to run in the Arduino environment, allowing using the SX1272, SX1276 tranceivers and compatible modules (such as some HopeRF RFM9x modules).
- Import following library into ArduinoIDE: https://github.com/matthijskooijman/arduino-lmic
- Before a device can communicate via The Things Network you need to register it with an application. To use the default Over The Air Activation (OTAA) you will need to register your device with its Device EUI.
- We used ttn_moteino_otaa.ino sketch with slight modification.
- Change the DEVEUI, APPEUI and APPKEY.
Note: DEVEUI, APPEUI are reverse order (LSB) - Change pin mapping to:
// Pin mapping const lmic_pinmap lmic_pins = { .nss = 4, .rxtx = LMIC_UNUSED_PIN, .rst = 13, .dio = {2, 1, 0}, }; - To send current temperature via TTN comment following:
//static mydata[] = "Hello, TTN over OTAA!";
- Don’t forget to add:
#include <OneWire.h>
#include <DallasTemperature.h> - Add to
void do_send(osjob_t* j)the following:sensor.requestTemperatures(); // read the temperature from a sensor float mytemp = sensor.getTempCByIndex(0); dtostrf(mytemp,5,2,(char*)mydata); // convert a float to a char array LMIC_setTxData2(1, mydata, strlen((char*) mydata), 1); //send data over the air! Serial.println(F("Packet queued"))
- Let LMIC compensate for an inaccurate clock. Just add this to your setup somewhere:
LMIC_setClockError(MAX_CLOCK_ERROR * 1 / 100); // Let LMIC compensate for +/- 1% clock error
This lets LMIC make the RX windows longer and start sooner so it will catch a downlink even when the clock runs up to 1% faster or slower.
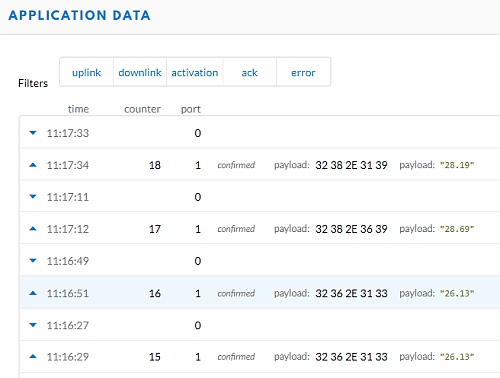
- Check TTN console if payload as temperature is received: