| TTN version: | TTNv3 |
| Last updated: | April 18, 2023 |
This article provides instructions for creating / importing a Grafana panel plugin (for sending downlinks via TTS). We use an open-source analytical and interactive visualization web application Grafana for data visualization, so it’s nice to have end device data as well as the ability to control the end device with downlinks without having to switch between different web pages or programs.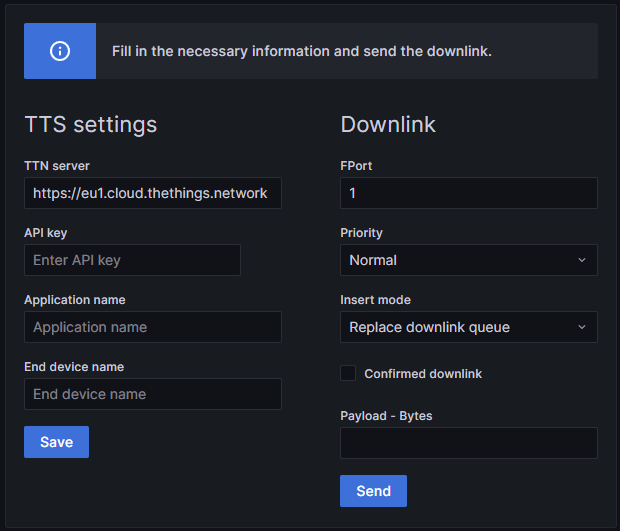
Notes
- You don’t need to create your own Grafana panel plugin for sending downlinks via TTS. All you have to do is import our ready-made plugin into your Grafana. To import our plugin, follow the instructions at the very bottom of this page in the “Import LoRa@VSB’s plugin from Github to your Grafana” section.
- Make sure your Grafana web application is served over HTTPS. Some browsers, like Safari on iOS, may block HTTP requests made from a secure context.
Prepare
- Ubuntu Desktop 22.04 LTS
- For final testing – Registered board in TTS with the ability to receive and decode Cayenne LPP format (for Adafruit Feather M0 RFM95 LoRa Radio, you can follow this Downlink reception and Cayenne LPP format decoding tutorial)
Fair Use Policy
The TTN documentation says about Fair Use Policy:
On The Things Network’s public community network a Fair Use Policy applies which limits the uplink airtime to 30 seconds per day (24 hours) per node and the downlink messages to 10 messages per day (24 hours) per node. If you use a private network, these limits do not apply, but you still have to be compliant with the governmental and LoRaWAN limits.
Note: Don’t send more than 10 downlinks per day per node.
Creating a Grafana panel plugin (for sending downlinks)
Preparation of the development environment
This section describes the installation of prerequisites for plugin development.
Prerequisites
- NodeJS >=14
- yarn
- Grafana Cloud account
- GitHub account
Docker, Node.JS and yarn
- Open a terminal.
- Update and upgrade packages:
$ sudo apt update
$ sudo apt upgrade
- Install the latest Docker version:
$ sudo apt install docker.io
- Install cURL and the latest LTS Node.JS version:
$ sudo apt install -y curl
$ curl -sL https://deb.nodesource.com/setup_18.x | sudo -E bash -
$ sudo apt install nodejs
- Check version of installed Node.JS and npm:
$ node --version
$ npm --version
- Install yarn and check its installed version:
$ sudo npm install --global yarn
$ yarn --version
Grafana Cloud account
You will need a Grafana Cloud account to generate an API key to sign your finished plugin.
- Create a Grafana Cloud account on Grafana if you don’t have one.
GitHub account
You will need a GitHub account to distribute your finished plugin.
- Create a GitHub account on GitHub if you don’t have one.
Create a new panel plugin
- Open a terminal in your /home/”username” directory.
- Create a grafana-plugins folder:
$ mkdir grafana-plugins
- Move into grafana-plugins folder and create a plugin from template using create-plugin:
$ cd grafana-plugins
$ npx @grafana/create-plugin@latest
- What is going to be the name of your plugin? – Write here what you want the panel to be called.
- What is the organization name of your plugin? – The name of your organization from the Grafana Cloud Portal.
- How would you describe your plugin? – Write something here or leave it blank.
- What type of plugin would you like? – panel
- Do you want to add Github CI and Release workflows? – N
- Do you want to add a Github workflow for automatically checking “Grafana API compatibility” on PRs? – N
- Change directory to your newly created plugin:
$ cd ./my-plugin-name
- Install the frontend dependencies:
$ yarn install
- Build the plugin frontend code and let it run in your terminal:
$ yarn dev
Check out the new plugin in your Grafana
- Open a new terminal in your /home/”username” directory.
- Run this command to run Grafana in a Docker container with the development mode enabled:
$ sudo docker run --rm -it -e "GF_DEFAULT_APP_MODE=development" -p 3000:3000 -v "$(pwd)"/grafana-plugins:/var/lib/grafana/plugins --name=grafana grafana/grafana:latest
- Meanings:
- sudo docker run – Runs a new Docker container.
- –rm – Removes the container when it exits.
- -it – Allocates a TTY for the container and keeps STDIN open.
- -e “GF_DEFAULT_APP_MODE=development” – Sets an environment variable, enabling development mode for Grafana.
- -p 3000:3000 – Maps the container’s port 3000 to the host’s port 3000.
- -v “$(pwd)”/grafana-plugins:/var/lib/grafana/plugins – Maps the grafana-plugins directory in the current working directory on the host to the /var/lib/grafana/plugins directory in the container.
- –name=grafana – Names the container “grafana”.
- grafana/grafana:latest – Specifies the Grafana image with the latest tag.
- Meanings:
- Now you can visit your Grafana web application from a browser at
http://localhost:3000. - Log in with username admin and password admin.
- Skip changing your Grafana account password.
- Go to Configuration -> Plugins. Make sure that your plugin is there.
Grafana dashboard setup
- Click on Dashboards -> Browse -> New -> New Dashboard.
- Choose Add a new panel.
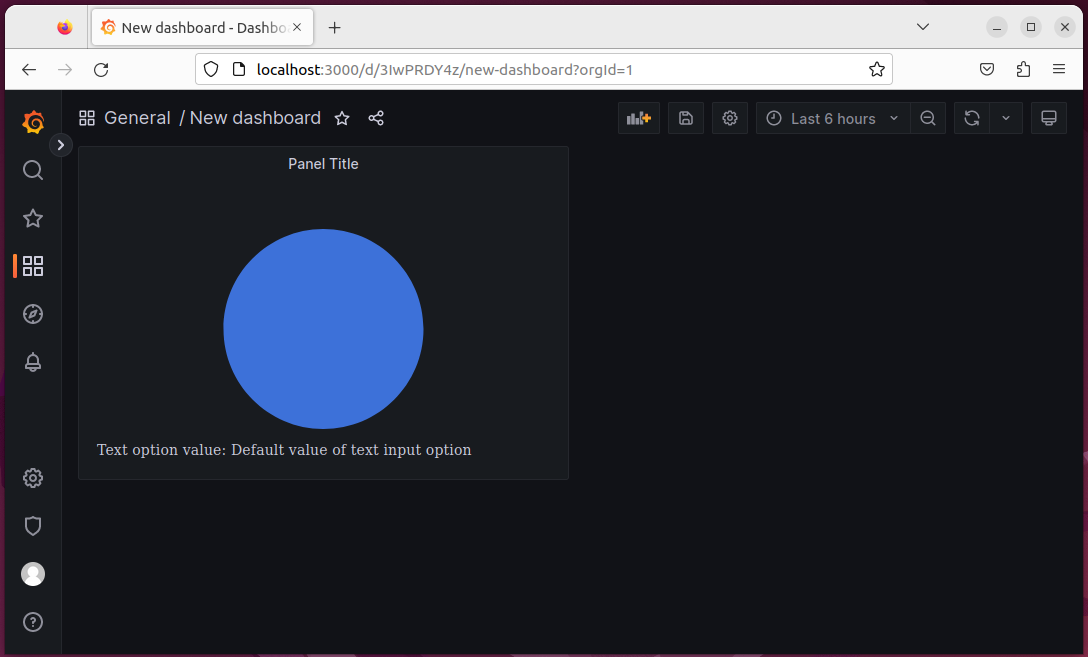
- Choose your plugin panel and save dashboard.
- If you now make some changes in the plugin code (and you have yarn dev running in the terminal), then when you reload the dashboard page, the new changes to the appearance and functionality of the panel will be updated immediately.
- You should see this:
Plugin programming – Basic information
Focus on /src/module.ts, /src/types.ts and /src/components/SimplePanel.tsx files.
SimplePanel.tsx
This file contains the main panel component, which is responsible for rendering the panel’s content. It is a React component that receives the panel’s options, data, and other properties.
- Define the panel component as a functional component or class component.
- Use the received props to access the panel options and data.
- Write the logic for rendering the panel content, such as charts, tables, or other visualizations.
- Handle any necessary interactivity, such as user input, panel resizing, or updates due to data changes.
types.ts
This file contains type definitions for your plugin. It usually includes interfaces for the plugin options, any custom data types, and props for the main panel component.
module.ts
This file is the entry point for the plugin. It’s responsible for registering the plugin with Grafana by exporting the panel component and any related configuration. Here, you import the main panel component and set various configuration options like the panel’s default options, editor configuration, and data formats. The module.ts file should export the plugin class, which extends PanelPlugin.
Useful links for programming your plugin:
- https://grafana.com/tutorials/build-a-panel-plugin/#0
- https://grafana.com/go/webinar/building-your-first-panel-plugin/
- https://developers.grafana.com/ui/latest/index.html?path=/story/docs-overview-intro–page
- https://grafana.com/docs/grafana/latest/developers/plugins/
Plugin programming – Panel plugin for sending downlinks
If you want, you can copy our code files to the Grafana panel plugin, which can send downlinks via TTS. Replace your files with the following files (marked in orange):
/src/components/SimplePanel.tsx
- onOptionsChange: (options: SimplePanelOptions) => void;
- This line adds a new property to the Props interface called onOptionsChange. This property is a function that takes a single argument options of type SimplePanelOptions and returns nothing (void).
- export const SimplePanel: React.FC<Props> = ({ options, data, width, height, onOptionsChange }) => {};
- a functional React component named SimplePanel is being defined. The component accepts properties (props) of the type Props, which was defined earlier. The component is written as an arrow function and is exported, so it can be imported and used in other parts of the application.
- The first part of the React component sets the initial state and configuration of the component using functional components and hooks. This initial state will be used and updated throughout the component’s lifecycle.
-
- The function checks if a given payload string is a valid hexadecimal value, returning true if valid and false otherwise.
- const sendPostRequest = async () => {};
- This function performs a POST request to send a downlink message via TTS. It first checks for empty fields, valid payload format, and complete hex values. Then, it constructs the target URL using the provided TTN server, encodes the payload to base64, and prepares the request header and data. Finally, it sends the POST request and sets the log message based on the response.
- const handleSaveTTS = () => {};
- The function is a handler for saving The Things Stack (TTS) settings. It first checks whether the API key is configured and updates the isAPIKeyConfigured state accordingly. Then, it calls onOptionsChange to update the panel options with the new settings, including the Application name, End device name, and TTN server. Finally, it sets the alert variant to ‘warning’ and displays a log message prompting the user to save the dashboard.
- const handleAPIKeyChange = (event: React.ChangeEvent<HTMLInputElement>) => {};
- The function handles updates to the API key input field, synchronizing the panel options with the user’s input using the onOptionsChange callback.
- const handleAPIkeyReset = () => {};
- The function handles the API key reset action. It updates the panel options by setting the targetAPIkey to an empty string and sets isAPIKeyConfigured to false.
- return ();
- This return statement renders the component layout containing three sections: Alert, TTS settings and Downlink settings.
- An alert at the top of the component displays messages related to validation, errors, or success.
- The TTS settings section allows the user to input TTN server, API key, Application name, and End device name. It also includes a “Save” button to save these settings.
- The Downlink settings section allows the user to input FPort, priority, insert mode, confirmed downlink (as a checkbox), and payload in bytes. It also includes a “Send” button to send a POST request with these settings.
- This return statement renders the component layout containing three sections: Alert, TTS settings and Downlink settings.
/src/types.ts
The variables defined here keep their values after saving the dashboard and after reloading the page.
- targetTTNServer – The URL of the ttn server (network cluster) is stored here
- targetAPIkey – This is where the API key from TTS is stored
- targetAppName – Application name is stored here
- targetEndDeviceName – End device name is stored here
/src/module.ts
Imports dependencies and creates a Grafana panel plugin called SimplePanel. It removes default padding and sets no custom options, then exports the plugin for use within Grafana.
Packaging the plugin
- If you are satisfied with the resulting code and the appearance of the plugin, package your plugin using the following command in a terminal in your plugin’s root directory:
$ yarn build
Signing the plugin
To sign a plugin, you need to decide the signature level you want to sign it under. The signature level of your plugin determines how you can distribute it. You can sign your plugin under three different signature levels.
Public plugins need to be reviewed by the Grafana team before you can sign them, but you can sign your plugin as Private plugin (Private Plugins are for use on your own Grafana. They may not be distributed to the Grafana community, and are not published in the Grafana catalog.).
For more information on signature levels, see the Plugin signature levels documentation.
Generate an API key
- Log into your Grafana Cloud account to access the Cloud Portal.
- Select the organization that you want to add an API key to, by selecting from the dropdown in top left.
- Click API Keys from the SECURITY section on the left.
- Click +Add API Key.
- In API Key Name, enter a name for your API key.
- In Role, select the PluginPublisher role.
- Click Create API Key.
- A token is created and displayed. Copy the token and store it in a safe place, because it will not be displayed again.
- Click Close when finished.
For more information on creating Grafana Cloud API keys, see the Create Grafana Cloud API keys documentation.
Sign a private plugin
- Make sure that the first part of the plugin ID matches the slug of your Grafana Cloud account. You can find the plugin ID in the
plugin.jsonfile inside your plugin directory. For example, if your account slug isacmecorp, you need to prefix the plugin ID withacmecorp-. - In your plugin directory, sign the plugin with the API key you just created. Grafana Sign Plugin creates a MANIFEST.txt file in the dist directory of your plugin.
$ export GRAFANA_API_KEY=<YOUR_API_KEY>
$ npx @grafana/sign-plugin@latest --rootUrls "http://localhost:3000"
For more information on signing a private plugin, see the Sign a private plugin documentation.
Push your plugin to GitHub
- First, make sure you have Git installed on your Ubuntu machine. If not, install it with:
$ sudo apt update
$ sudo apt install git
- Set your GitHub username and email if you haven’t already:
$ git config --global user.name "Your Name"
$ git config --global user.email "your.email@example.com"
- Change to your plugin directory (my-plugin):
$ cd org-my-plugin-panel
- Create the org-my-plugin-panel folder in your local repository:
$ mkdir org-my-plugin-panel
- Open the .gitignore file with the following command:
$ nano .gitignore
- In the file (.gitignore), delete the following line, save and close the file.
dist/
- Copy the required files (dist, README.md, CHANGELOG.md, and LICENSE) to the new folder:
$ cp -r dist org-my-plugin-panel/
$ cp README.md org-my-plugin-panel/
$ cp CHANGELOG.md org-my-plugin-panel/
$ cp LICENSE org-my-plugin-panel/
- Initialize a Git repository in your plugin directory:
$ git init
- Add the changes to the staging area:
$ git add org-my-plugin-panel
- Create the release commit:
$ git commit -m "Release v1.0.0"
- Go to GitHub and create a new repository (you can do this by clicking the “+” icon in the upper-right corner and selecting “New repository”). Give it a name and choose the desired visibility (public or private).
- Copy the URL of your new GitHub repository.
- Add your GitHub repository as a remote in your local Git repository (Replace https://github.com/your-username/your-repository.git with the URL you copied in step 12.):
$ git remote add origin https://github.com/your-username/your-repository.git
- Push to GitHub:
$ git branch -M main
$ git push -u origin main
Import your plugin from Github to your Grafana
- If you followed the Telegraf and InfluxDB and Grafana tutorial, clone your plugin’s GitHub repository to your folder my-grafana-plugins:
$ git clone https://github.com/yourusername/yourpluginrepo.git my-grafana-plugins - You need to restart the grafana container:
$ sudo docker restart grafana
- Now you can visit your Grafana web application from a browser in your internal network at
http://IP_AddressOfServer:3000(for example 192.168.1.120:3000). - Log in with your username and password.
- Click on Configuration -> Plugins. Make sure that your plugin is there.
- Click on Dashboards -> Browse -> Your dashboard.
- Choose Add a new panel.
- Choose your plugin panel and save dashboard.
Import LoRa@VSB’s plugin from Github to your Grafana
- If you followed the Telegraf and InfluxDB and Grafana tutorial, clone our plugin’s GitHub repository to your folder my-grafana-plugins:
$ git clone https://github.com/OndrejKnebl/TTS_Downlink_Sender_plugin.git my-grafana-plugins - You need to restart the grafana container:
$ sudo docker restart grafana
- Now you can visit your Grafana web application from a browser in your internal network at
http://IP_AddressOfServer:3000(for example 192.168.1.120:3000). - Log in with your username and password.
- Click on Configuration -> Plugins. Make sure that your plugin is there.
- Click on Dashboards -> Browse -> Your dashboard.
- Choose Add a new panel.
- Choose your plugin panel and save dashboard.
Plugin User Guide
Panel – TTS settings
- First, enter the URL of the TTN server (TTN Network cluster).
- Next, enter the API key, which you create according to the instructions below – “TTS API key”.
- Then fill in the Application name. The Application name is in TTS -> Applications -> “YourAppName”.
- Then fill in the End device name. End device name is in TTS -> Applications -> YourAppName -> “YourEndDeviceName”.
- If you want to save these settings, press the Save button and then save the Dashboard. (If you do not save the settings in the described way, the original settings will be applied after reloading the page in the browser.).
TTS API key
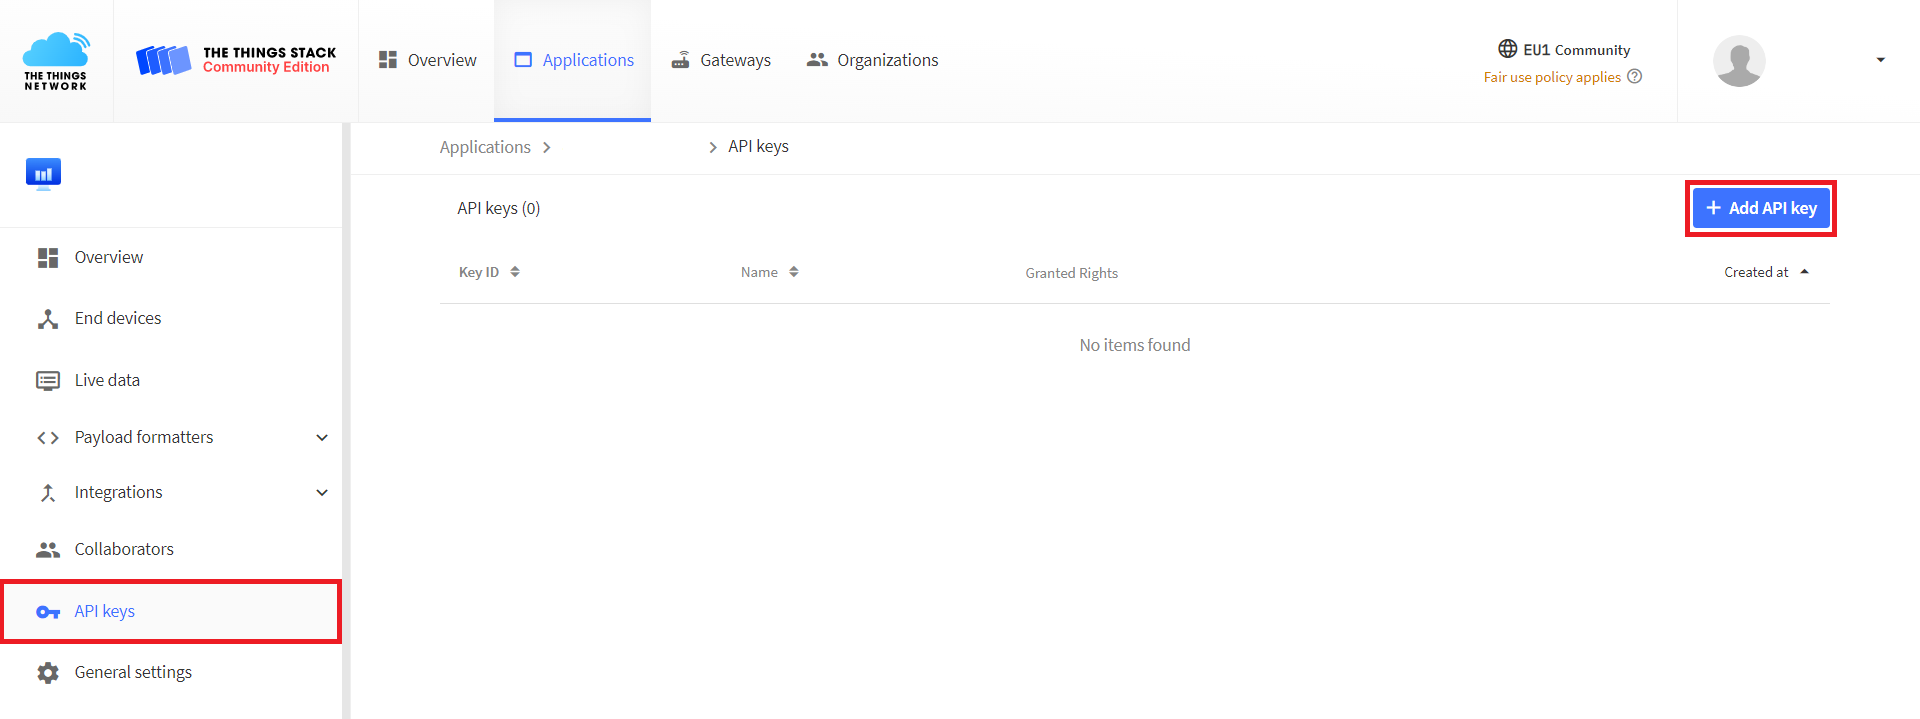
- In TTS -> Applications -> YourAppName -> API keys click button +Add API key.
- Write something in the Name.
- Select Grant individual rights.
- Check Write downlink application traffic.
- Click on button Create API key.

- Click the Copy to clipboard button and paste the key into the plugin panel to API key entry.
Panel – Downlink
- Select the desired Downlink settings (FPort (1-223), Priority, Insert mode and downlink confirmation) – These settings are the same as in TTS -> Applications -> YourAppName -> YourEndDeviceName -> Messaging -> Downlink.
- Then fill the Payload – Bytes entry with valid hexadecimal values.
- Use the Send button to send the downlink.
Panel – Send test downlink
- Fill in the required information according to the “Panel – TTS settings” and “Panel – Downlink” sections.
- In the Payload – Bytes entry, write 010001 (channel 01, type 00 (digital input), value 01).
- Click on button Send.
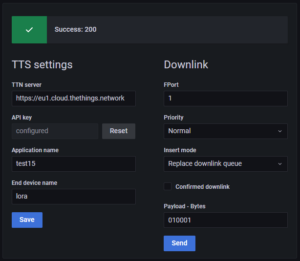
- In TTS -> Applications -> YourAppName -> YourEndDeviceName -> Live data you should see this:

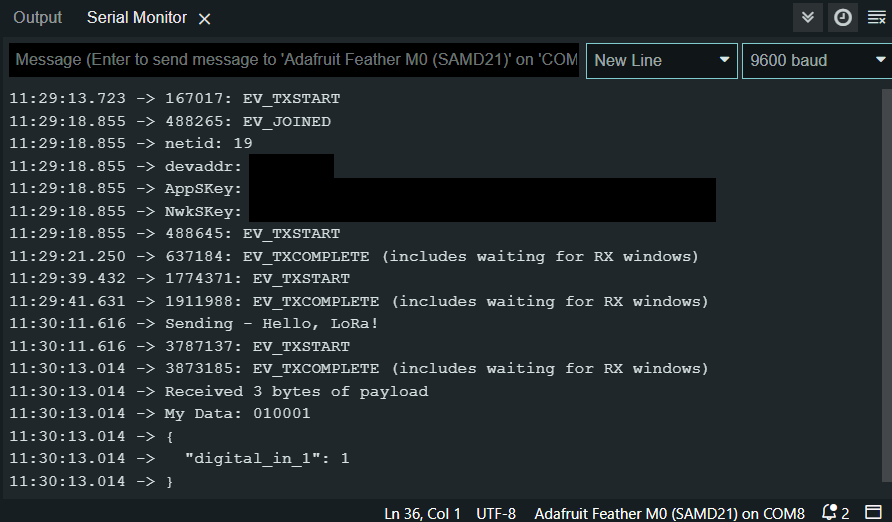
- After sending the uplink and receiving the downlink by Feather, you should see the following in Serial Monitor (Downlink reception and Cayenne LPP format decoding tutorial):