| TTN version: | TTNv3 / TTS SANDBOX |
| Activation: | OTAA / ABP |
| Device Class: | Class A |
| Last revision: | October 28, 2024 |
At the Feather M0‘s heart is an ATSAMD21G18 ARM Cortex M0 processor, clocked at 48 MHz and at 3.3 V logic. This chip has a whopping 256 KB of FLASH (8x more than the ATmega32u4) and 32 KB of RAM (16x as much).
The Adafruit Feather M0 with RFM95 LoRa Radio – 900 MHz uses the extra space left over to add an RFM95 LoRa 868/915 MHz radio module. This is the 900 MHz radio version, which can be used for either 868 MHz or 915 MHz transmission/reception. See complete specification here.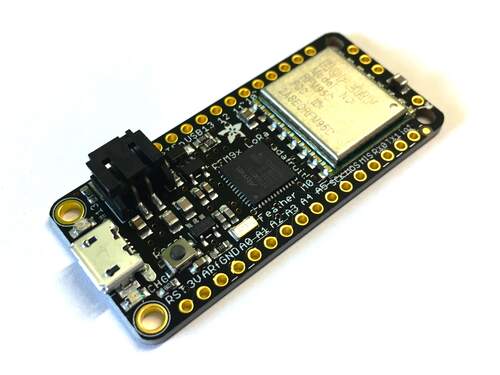
Prepare
- Adafruit Feather M0 with RFM95 LoRa Radio – 900 MHz
- 1x wire
- breadboard (optional)
- PC + micro USB cable
Assembly
Wire up the Adafruit Feather M0’s IO1 pin with pin 6.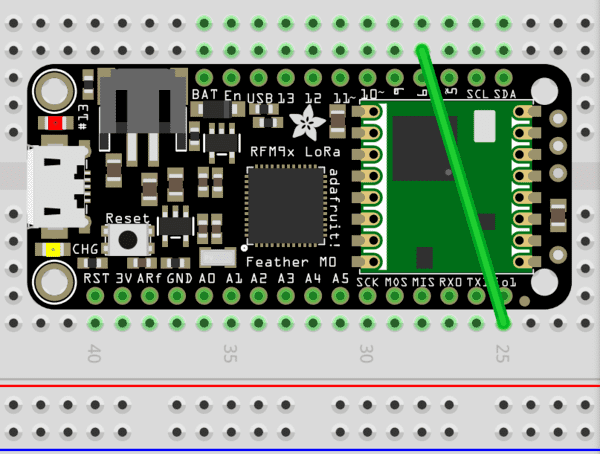
Arduino IDE setup
- Download Arduino IDE.
- Run Arduino IDE.
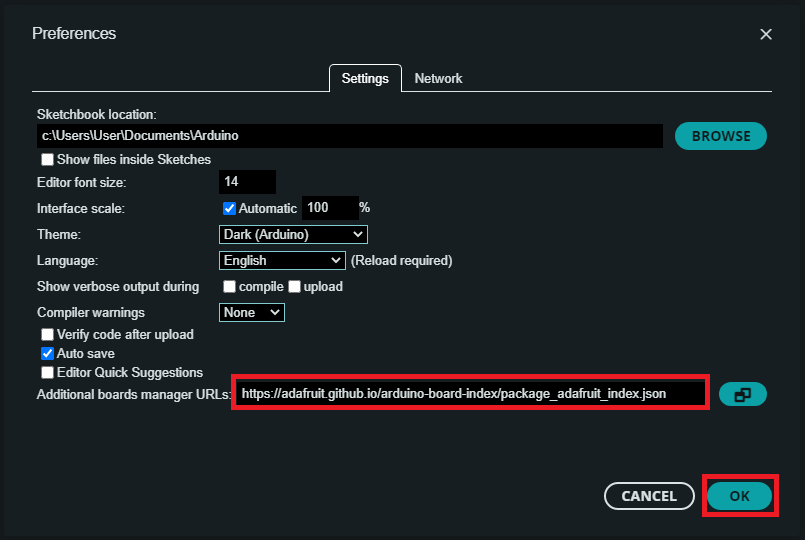
- In the Arduino IDE File -> Preferences copy and paste the link below into the Additional Boards Manager URLs.
https://adafruit.github.io/arduino-board-index/package_adafruit_index.json - Click OK.
- Install the Adafruit boards via Boards Manager -> search Arduino SAMD Boards -> Install.
- Install the Adafruit boards via Boards Manager -> search Adafruit SAMD Boards -> Install.
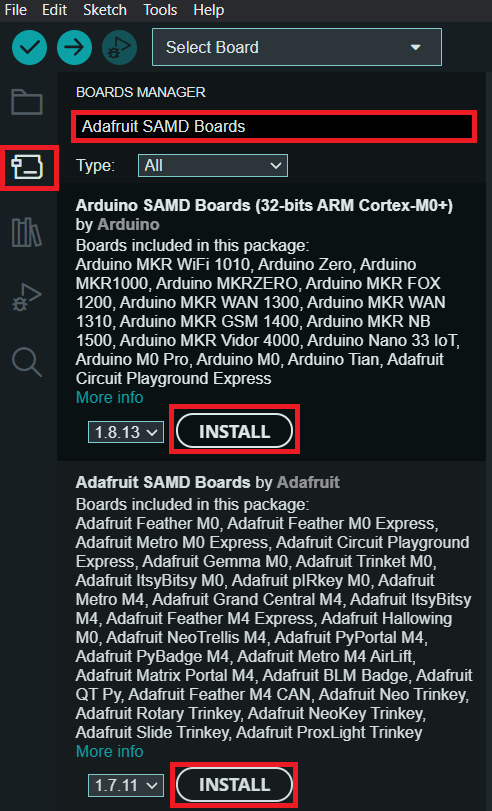
- You should see in Tools -> Board -> Adafruit SAMD the Adafruit Feather M0.
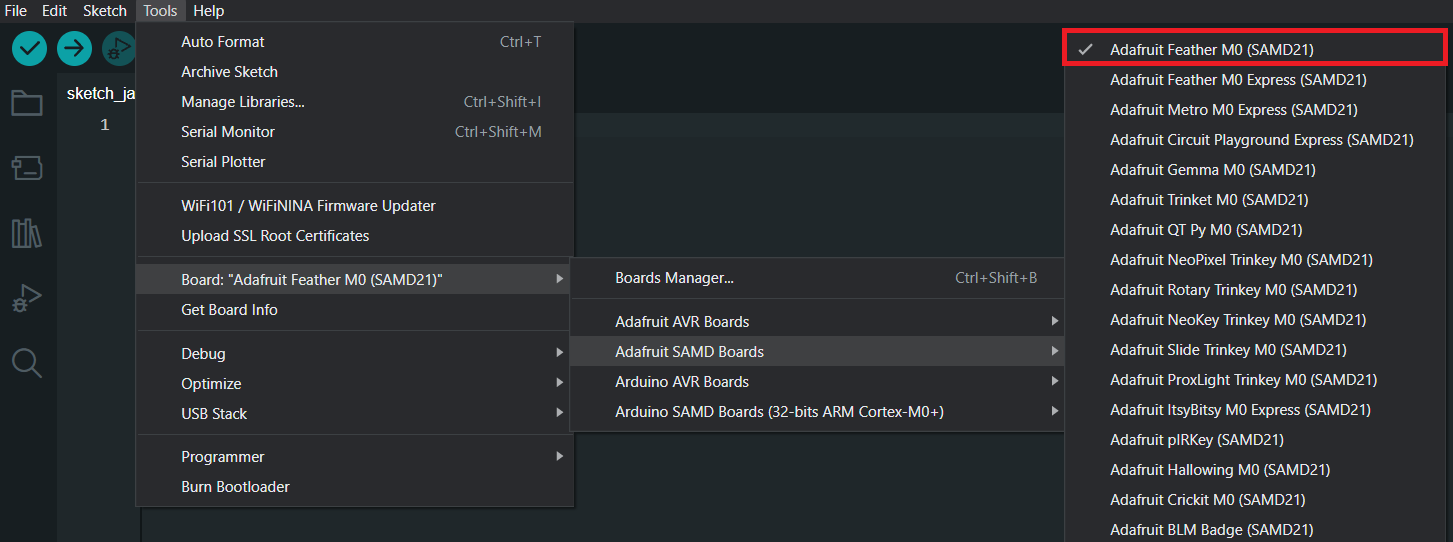
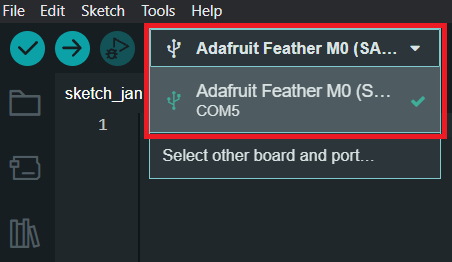
- Connect the Adafruit Feather M0 using micro USB cable to your computer.
- Choose the appropriate COM port which is used for communication with Adafruit.
Activation
Over The Air Activation (OTAA) – the most secure and recommended activation method for end devices. Devices perform a join procedure with the network, during which a dynamic device address is assigned and security keys are negotiated with the device.
Activation By Personalization (ABP) – requires hardcoding the device address as well as the security keys in the device. ABP is less secure than OTAA and also has the downside that devices can not switch network providers without manually changing keys in the device.
See the documentation for more information on activation.
Over The Air Activation (OTAA)
MCCI LoRaWAN LMIC library setup
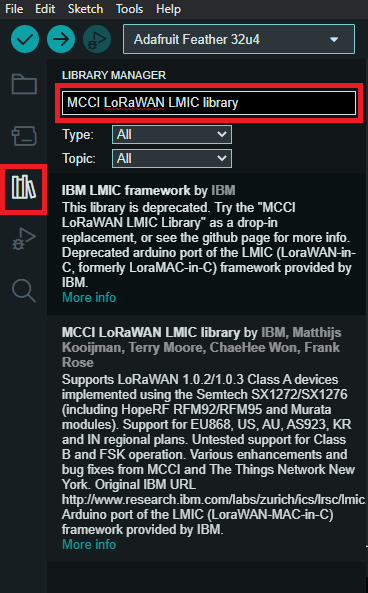
- In the Arduino IDE Library Manager search MCCI LoRaWAN LMIC library by Terry Moore and install it.
- On Windows open lmic_project_config.h located in \Documents\Arduino\libraries\MCCI_LoRaWAN_LMIC_library\project_config\
- Change project definitions to definitions listed bellow and save it.
// project-specific definitions
#define CFG_eu868 1                  //for Europe (change it based on your location)
#define CFG_sx1276_radio 1
#define DISABLE_PING 1
#define DISABLE_BEACONS 1
Add Feather M0 into The Things Stack
- Create an account on The Things Network if you don’t have one.
- Login on The Things Network.
- Click on your username and choose Console.
- Select a network cluster.
Add application
- Go to applications.
- Click on button + Add application.
- Write something into Application ID.
- Click on button Create application.
Add end device
- In your application click on button + Register end device.
- Input Method – Choose Enter end device specifics manually.
- Frequency plan – Europe 863-870 MHz (SF9 for RX2 – recommended)
- LoRaWAN version – LoRaWAN Specification 1.0.3
- Click on Show advanced activation, LoRaWAN class and cluster settings
- Activation mode – Over the air activation (OTAA)
- Additional LoRaWAN class capabilities – None (class A only)
- Deselect – Use network’s default MAC settings
- Rx2 data rate = 3
- Rx2 frequency = 869,525 MHz
- JoinEUI – 0000000000000000
- Click on Confirm.
- DevEUI – Generate
- AppKey – Generate
- End device ID – here you can name your device
- After registration – View registered end device
- Click on button Register end device
- Click on Settings
- Network layer – Expand
- Click on Advanced MAC settings
- Desired Rx1 delay = 1
- Rx1 data rate offset = 0
- Add Frequency = 868100000
- Add Frequency = 868300000
- Add Frequency = 868500000
- Add Frequency = 867100000
- Add Frequency = 867300000
- Add Frequency = 867500000
- Add Frequency = 867700000
- Add Frequency = 867900000
- Adaptive data rate (ADR) – Dynamic mode
- Click on button Save changes
Sending “Hello LoRa!” to TTS
- In TTS -> Applications -> YourAppName -> YourEndDeviceName -> Payload formatters -> Uplink change Formatter type to Custom Javascript formatter and to Formatter code copy and paste code bellow:
function Decoder(bytes, port) {
   return {
          mydata: String.fromCharCode.apply(null, bytes) // Decode plain text
   };
}
- Save changes
- To your Arduino IDE copy and paste program Sending Hello LoRa – OTAA.
- In program replace APPEUI, DEVEUI and APPKEY with keys in TTS. Keys are in TTS -> Applications -> YourAppName -> YourEndDeviceName -> Device overview -> Activation information.
- Connect Adafruit Feather M0 using micro USB cable to your computer.
- Choose the appropriate COM port which is used for communication with Adafruit.
- In Arduino IDE click on Upload button to upload program to your Adafruit Feather M0.
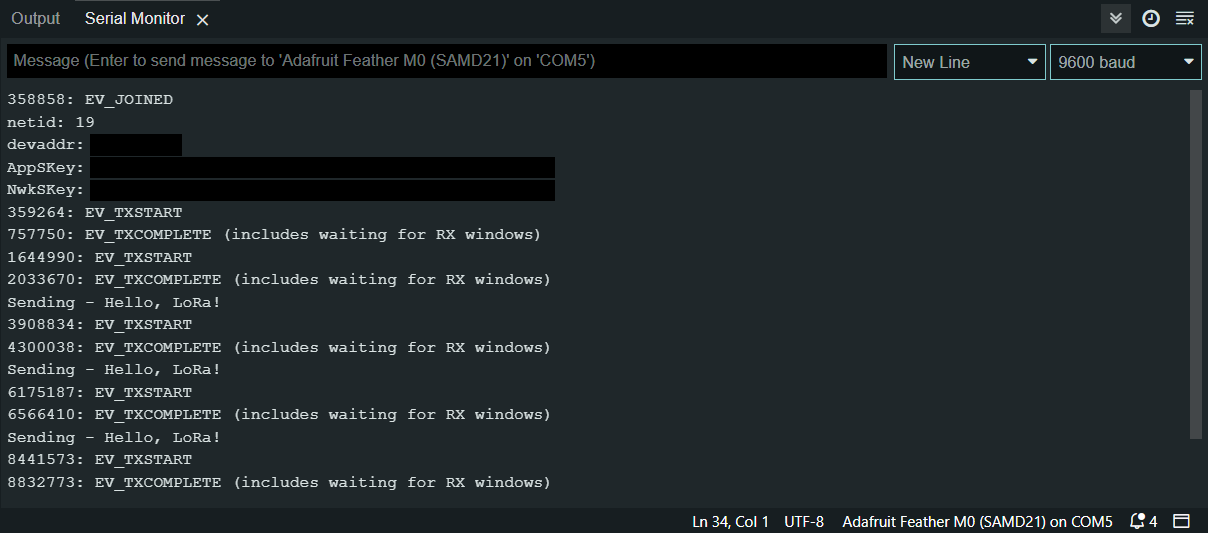
- In Arduino IDE click on Serial Monitor button and you should every +-30 seconds see “Sending – Hello, LoRa!”:
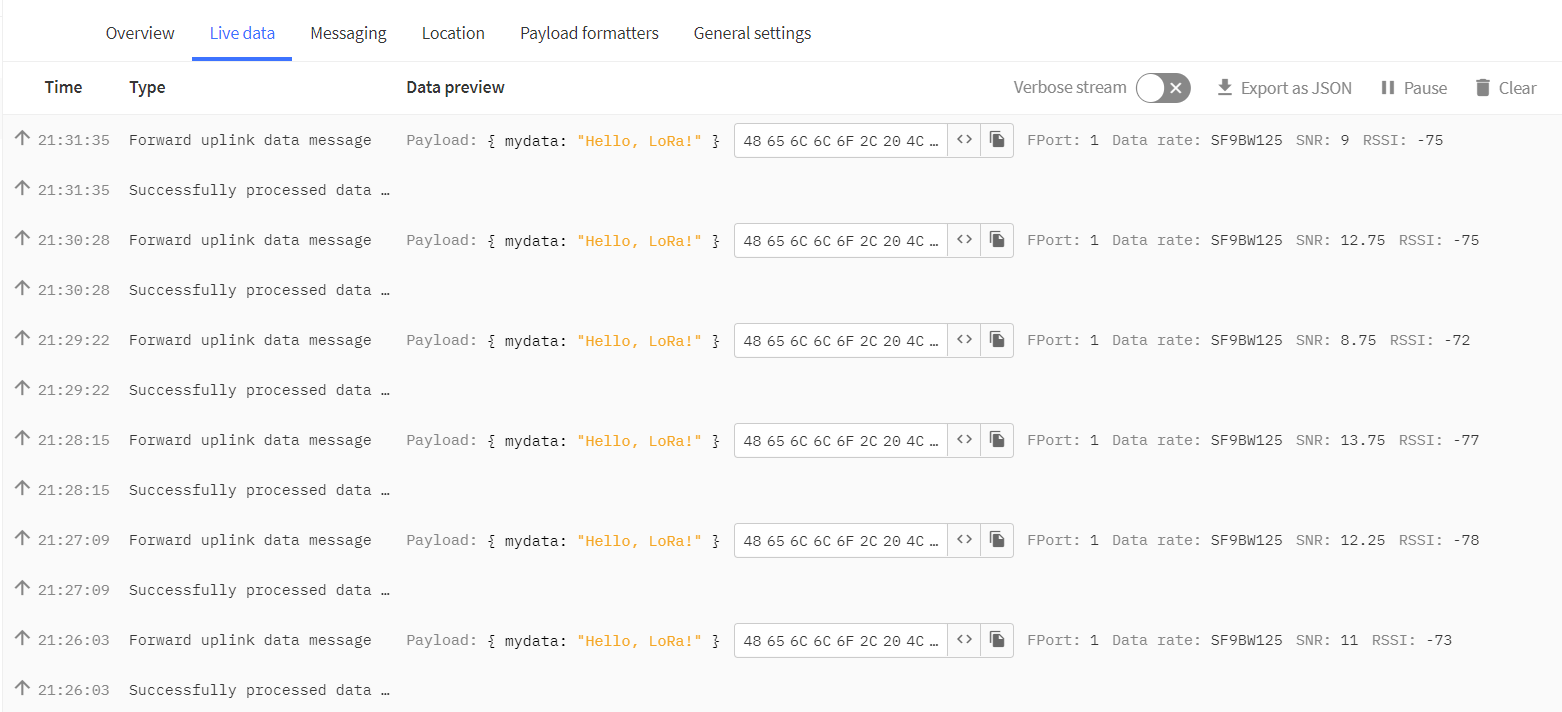
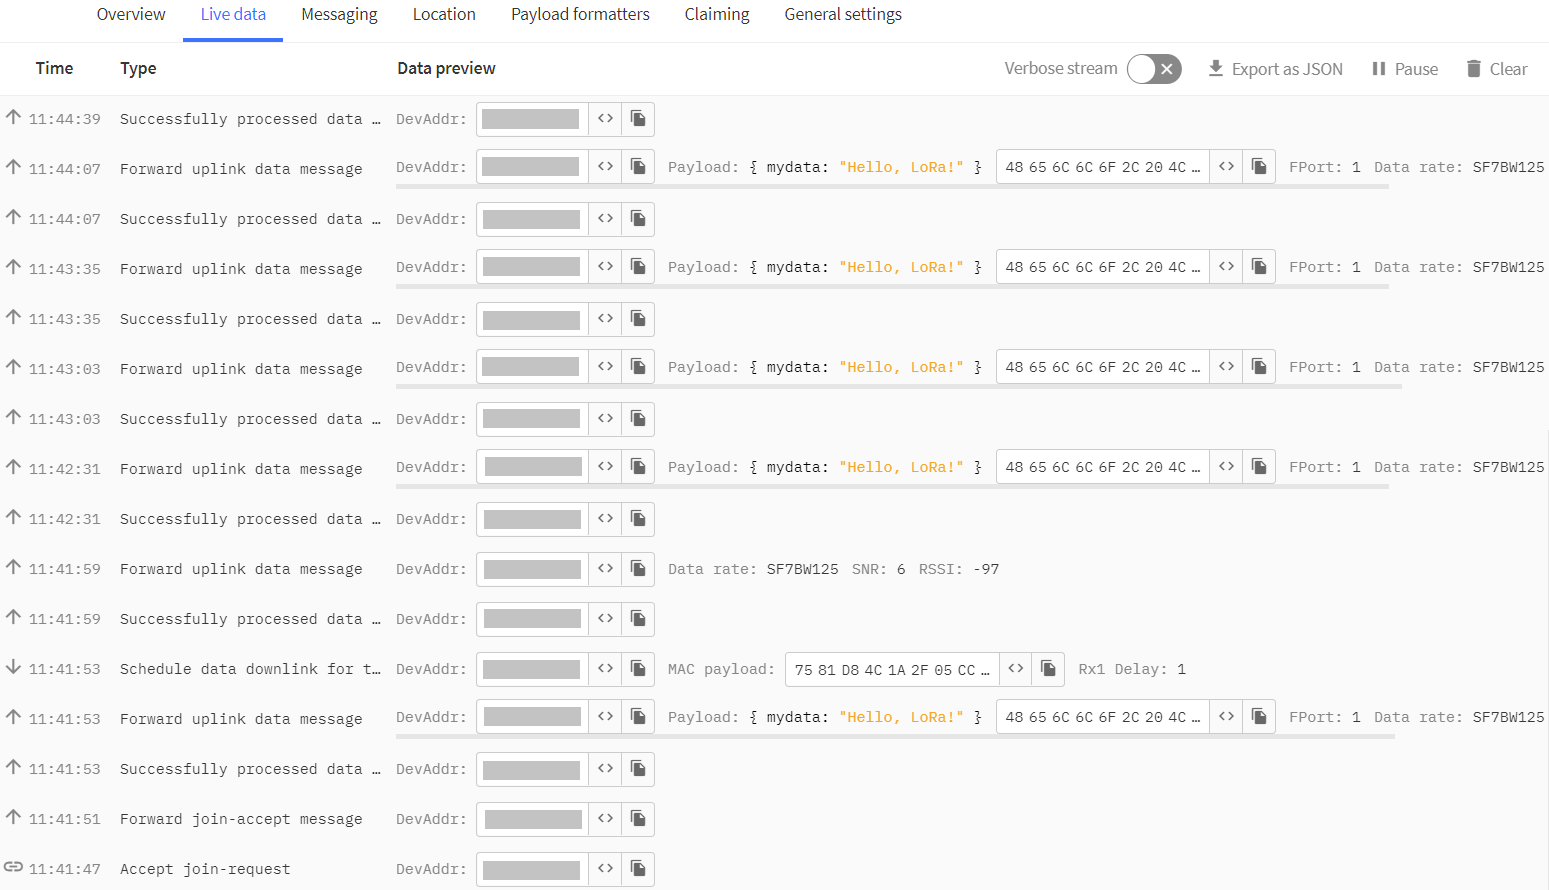
- In TTS -> Applications -> YourAppName -> YourEndDeviceName -> Live data you should see this:
Activation By Personalization (ABP)
MCCI LoRaWAN LMIC library setup
- In the Arduino IDE Library Manager search MCCI LoRaWAN LMIC library by Terry Moore and install it.
- On Windows open lmic_project_config.h located in \Documents\Arduino\libraries\MCCI_LoRaWAN_LMIC_library\project_config\
- Change project definitions to definitions listed bellow and save it.
// project-specific definitions
#define CFG_eu868 1                  //for Europe (change it based on your location)
#define CFG_sx1276_radio 1
#define DISABLE_JOIN 1
#define DISABLE_PING 1
#define DISABLE_BEACONS 1
Add Feather M0 into The Things Stack
- Create an account on The Things Network if you don’t have one.
- Login on The Things Network.
- Click on your username and choose Console.
- Select a network cluster.
Add application
- Go to applications.
- Click on button + Add application.
- Write something into Application ID.
- Click on button Create application.
Add end device
- In your application click on button + Register end device.
- Input Method – Choose Enter end device specifics manually.
- Frequency plan – Europe 863-870 MHz (SF9 for RX2 – recommended)
- LoRaWAN version – LoRaWAN Specification 1.0.3
- Click on Show advanced activation, LoRaWAN class and cluster settings
- Activation mode – Activation by personalization (ABP)
- Additional LoRaWAN class capabilities – None (class A only)
- Deselect – Use network’s default MAC settings
- Rx1 data rate offset = 0
- Rx1 delay = 1
- Resets frame counters – Enabled
- Rx2 data rate = 3
- Rx2 frequency = 869,525 MHz
- Add entry = 868100000
- Add entry = 868300000
- Add entry = 868500000
- Add entry = 867100000
- Add entry = 867300000
- Add entry = 867500000
- Add entry = 867700000
- Add entry = 867900000
- DevEUI – Generate
- Device address – Generate
- AppSKey – Generate
- NwkSKey – Generate
- End device ID – here you can name your device
- After registration – View registered end device
- Click on button Register end device
- Click on Settings
- Network layer – Expand
- Click on Advanced MAC settings
- Desired Rx1 delay = 1
- Adaptive data rate (ADR) – Dynamic mode
- Click on button Save changes
Sending “Hello LoRa!” to TTS
- In TTS -> Applications -> YourAppName -> YourEndDeviceName -> Payload formatters -> Uplink change Formatter type to Custom Javascript formatter and to Formatter code copy and paste code bellow:
function Decoder(bytes, port) {
   return {
          mydata: String.fromCharCode.apply(null, bytes) // Decode plain text
   };
}
- Save changes
- To your Arduino IDE copy and paste program Sending Hello LoRa.
- In program replace NWKSKEY, APPSKEY and DEVADDR with keys of your end device registred in TTS. Keys are in TTS -> Applications -> YourAppName -> YourEndDeviceName -> Device overview -> Session information.
- Connect Adafruit Feather M0 using micro USB cable to your computer.
- Choose the appropriate COM port which is used for communication with Adafruit.
- In Arduino IDE click on Upload button to upload program to your Adafruit Feather M0.
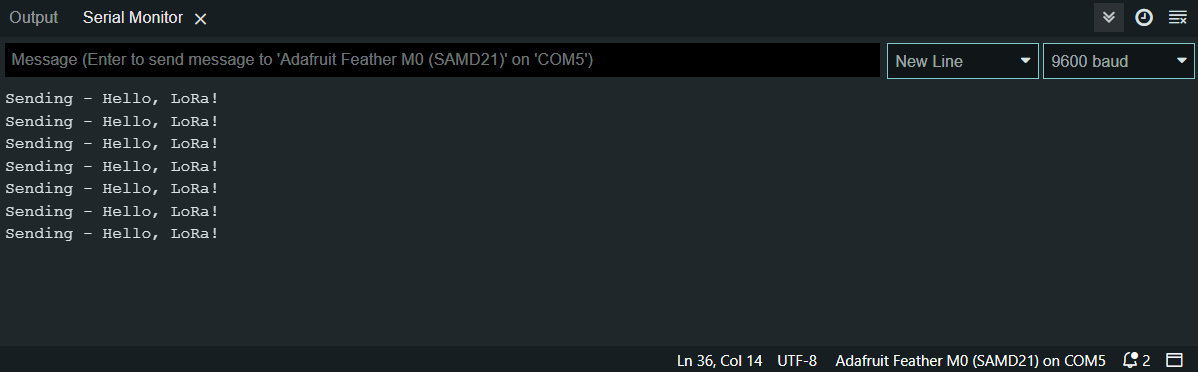
- In Arduino IDE click on Serial Monitor button and you should every +-1 minute see “Sending – Hello, LoRa!”:
- In TTS -> Applications -> YourAppName -> YourEndDeviceName -> Live data you should see this: