| TTN version: | TTNv3 / TTS SANDBOX |
| Frequency: | Europe 433 MHz (ITU region 1) Europe 863-870 MHz (SF9 for RX2 – recommended) |
| Activation: | OTAA / ABP |
| Device Class: | Class A, B, C |
| LoRaWAN: | 1.0.3 |
| Last revision: | July 21, 2025 |
Seeeduino LoRaWAN is an Arduino development board with LoRaWAN protocol embedded, through which you can get started quickly to experience LoRa’s advantage in the field of IoT. Based on the communication module RHF76-052DM v3.5.13, Seeeduino LoRaWAN is compatible with LoRaWAN Class A, B, C and supports a variety of communication frequencies. See complete specification here.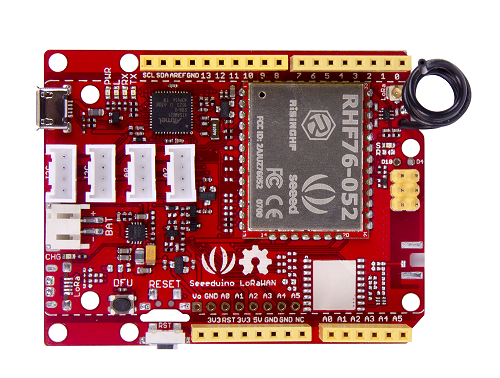
Prepare
- Seeeduino LoRaWAN
- PC + micro USB cable
Arduino IDE setup
- Download Arduino IDE.
- Run Arduino IDE.
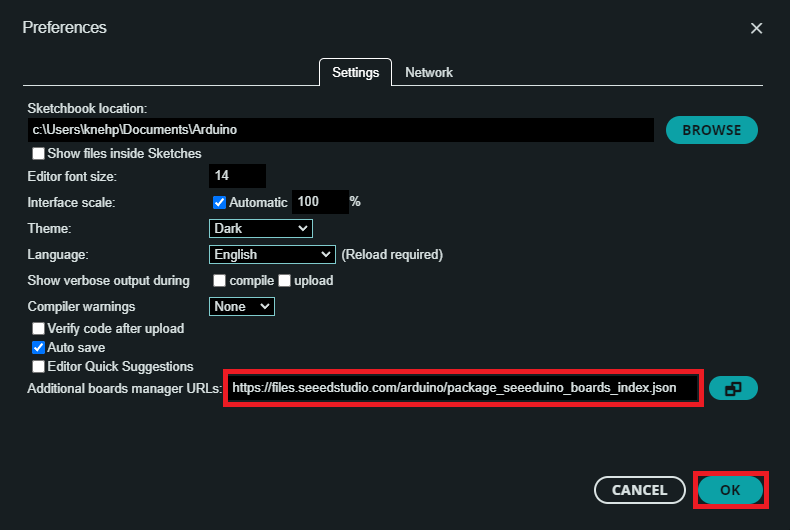
- In the Arduino IDE File -> Preferences copy and paste the link below into the Additional Boards Manager URLs.
https://files.seeedstudio.com/arduino/package_seeeduino_boards_index.json - Click OK.
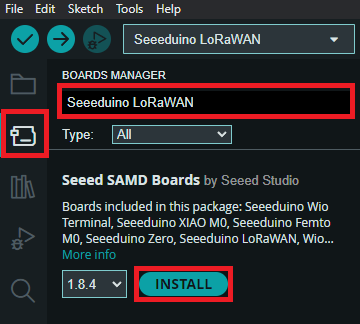
- Install the Seeed SAMD Boards via Boards Manager -> search Seeeduino LoRaWAN -> Install.
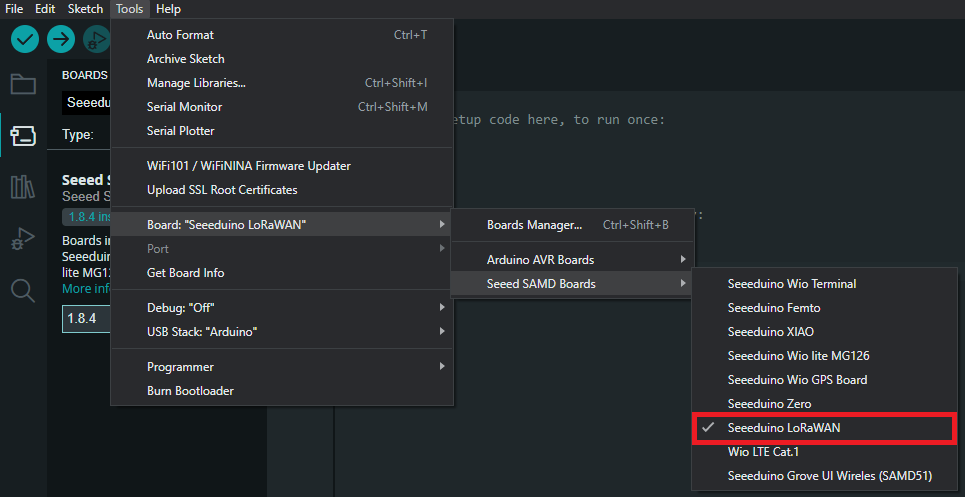
- You should see in Tools -> Board -> Seeed SAMD Boards the Seeeduino LoRaWAN.
- Connect the Seeeduino LoRaWAN using micro USB cable to your computer.
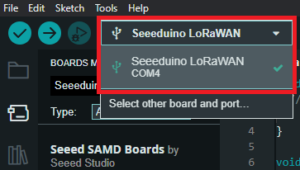
- Choose the appropriate COM port which is used for communication with Seeeduino.
Seeeduino LoRaWAN library setup
- Download as ZIP this Seeeduino LoRaWAN library.
- In the Arduino IDE Sketch -> Include Library -> Add .ZIP Library… choose downloaded ZIP.
Activation
Over The Air Activation (OTAA) – the most secure and recommended activation method for end devices. Devices perform a join procedure with the network, during which a dynamic device address is assigned and security keys are negotiated with the device.
Activation By Personalization (ABP) – requires hardcoding the device address as well as the security keys in the device. ABP is less secure than OTAA and also has the downside that devices can not switch network providers without manually changing keys in the device.
See the documentation for more information on activation.
Device classes
The LoRaWAN specification defines three device types: Class A, Class B, and Class C. All LoRaWAN devices must implement Class A, whereas Class B and Class C are extensions to the specification of Class A devices. All device classes support bi-directional communication (uplink and downlink).
See the documentation for more information on device classes.
Fair Use Policy
The TTN documentation says about Fair Use Policy:
On The Things Network’s public community network a Fair Use Policy applies which limits the uplink airtime to 30 seconds per day (24 hours) per node and the downlink messages to 10 messages per day (24 hours) per node. If you use a private network, these limits do not apply, but you still have to be compliant with the governmental and LoRaWAN limits.
Note: Don’t send more than 10 downlinks per day per node.
Frequency Plan
Choose one of these frequency plans:
Europe 863-870 MHz (SF9 for RX2 – recommended)
Over The Air Activation (OTAA)
Add Seeeduino LoRaWAN into The Things Stack
- Create an account on The Things Network if you don’t have one.
- Login on The Things Network.
- Click on your username and choose Console.
- Select a network cluster.
Add application
- Go to applications.
- Click on button + Add application.
- Write something into Application ID.
- Click on button Create application.
Add end device
- In your application click on button + Register end device.
- Input Method – Choose Enter end device specifics manually.
- Frequency plan – Europe 863-870 MHz (SF9 for RX2 – recommended)
- LoRaWAN version – LoRaWAN Specification 1.0.3
- Click on Show advanced activation, LoRaWAN class and cluster settings
- Activation mode – Over the air activation (OTAA)
Class A
- Additional LoRaWAN class capabilities – None (class A only)
- Deselect – Use network’s default MAC settings
- Rx2 data rate = 3
- Rx2 frequency = 869,525 MHz
Class B
- Additional LoRaWAN class capabilities – Class B (Beaconing)
- Deselect – Use network’s default MAC settings
- Class B timeout – Set to value less than the time between two ping slots (ping slot periodicity) (for example every 15 seconds)
- Ping slot periodicity – The amount of time between two receive windows (ping slots) (for example every 16 seconds)
- Ping slot data rate – 3
- Beacon frequency – 869,525 MHz
- Ping slot frequency – 869,525 MHz
- Rx2 data rate = 3
- Rx2 frequency = 869,525 MHz
Class C
- Additional LoRaWAN class capabilities – Class C (Continuous)
- Deselect – Use network’s default MAC settings
- Class C timeout – 300 seconds
- Rx2 data rate = 3
- Rx2 frequency = 869,525 MHz
- JoinEUI – 0000000000000000
- Click on Confirm.
- DevEUI – Generate
- AppKey – Generate
- End device ID – here you can name your device
- After registration – View registered end device
- Click on button Register end device
- Click on Settings
- Network layer – Expand
- Click on Advanced MAC settings
- Desired Rx1 delay = 1
- Rx1 data rate offset = 0
- Add Frequency = 868100000
- Add Frequency = 868300000
- Add Frequency = 868500000
- Add Frequency = 867100000
- Add Frequency = 867300000
- Add Frequency = 867500000
- Add Frequency = 867700000
- Add Frequency = 867900000
- Adaptive data rate (ADR) – Dynamic mode
- Click on button Save changes
Sending “Hello LoRa!” to TTS
- In TTS -> Applications -> YourAppName -> YourEndDeviceName -> Payload formatters -> Uplink change Formatter type to Custom Javascript formatter and to Formatter code copy and paste code bellow:
function Decoder(bytes, port) {
   return {
          mydata: String.fromCharCode.apply(null, bytes) // Decode plain text
   };
}
- Save changes
Class A
- In the Arduino IDE File -> Examples -> SeeeduinoLoRaWan-x.x.x -> open 868_OTAA_Class_A_Hello_LoRa
- In program replace APP_EUI, DEV_EUI and APP_KEY with keys in TTS. Keys are in TTS -> Applications -> YourAppName -> YourEndDeviceName -> Activation information.
- Connect Seeeduino LoRaWAN using micro USB cable to your computer.
- Choose the appropriate COM port which is used for communication with Seeeduino.
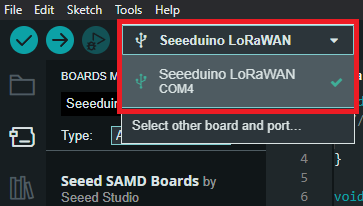
- In Arduino IDE click on Upload button to upload program to your Seeeduino LoRaWAN.
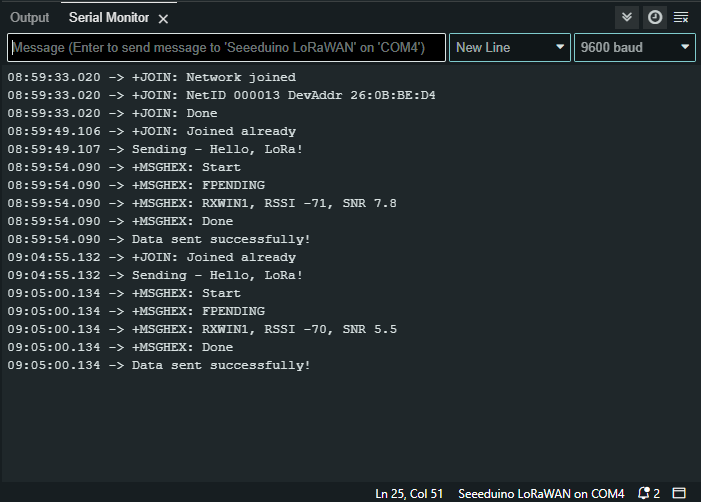
- In Arduino IDE click on Serial Monitor button and you should every +-300 seconds see “Sending – Hello, LoRa!”:
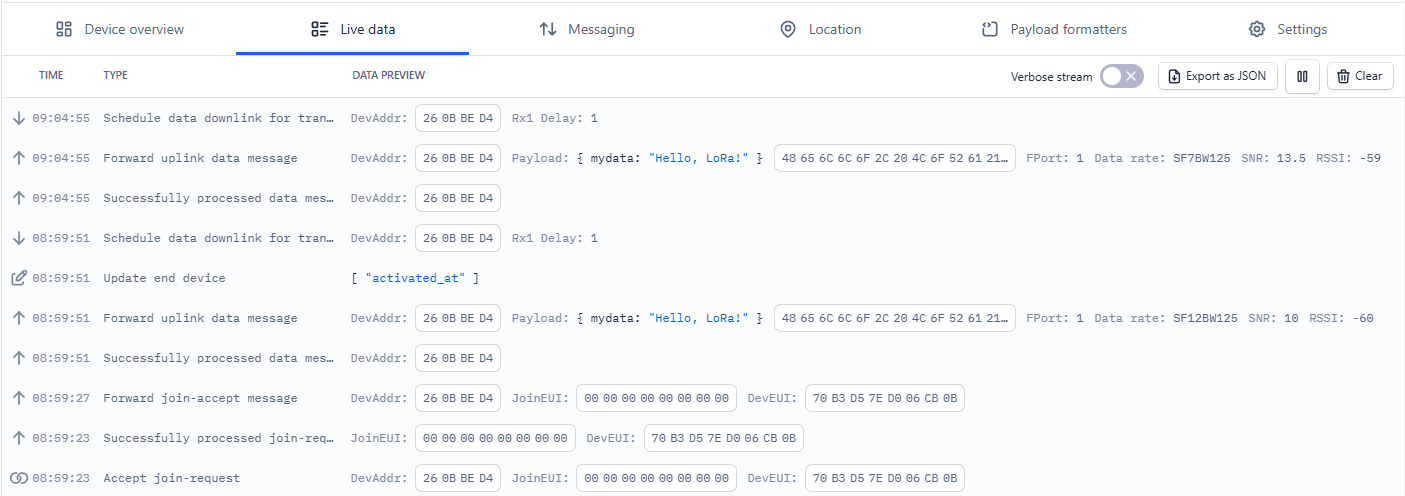
- In TTS -> Applications -> YourAppName -> YourEndDeviceName -> Live data you should see this:
Class B
- In the Arduino IDE File -> Examples -> SeeeduinoLoRaWan-x.x.x -> open 868_OTAA_Class_B_Hello_LoRa
- In program replace APP_EUI, DEV_EUI and APP_KEY with keys in TTS. Keys are in TTS -> Applications -> YourAppName -> YourEndDeviceName -> Activation information.
- Connect Seeeduino LoRaWAN using micro USB cable to your computer.
- Choose the appropriate COM port which is used for communication with Seeeduino.

- In Arduino IDE click on Upload button to upload program to your Seeeduino LoRaWAN.
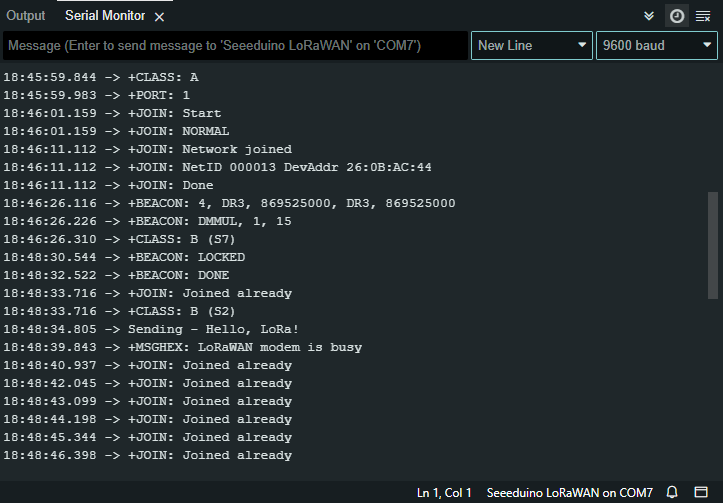
- In Arduino IDE click on Serial Monitor button and you should every +-300 seconds see “Sending – Hello, LoRa!”:
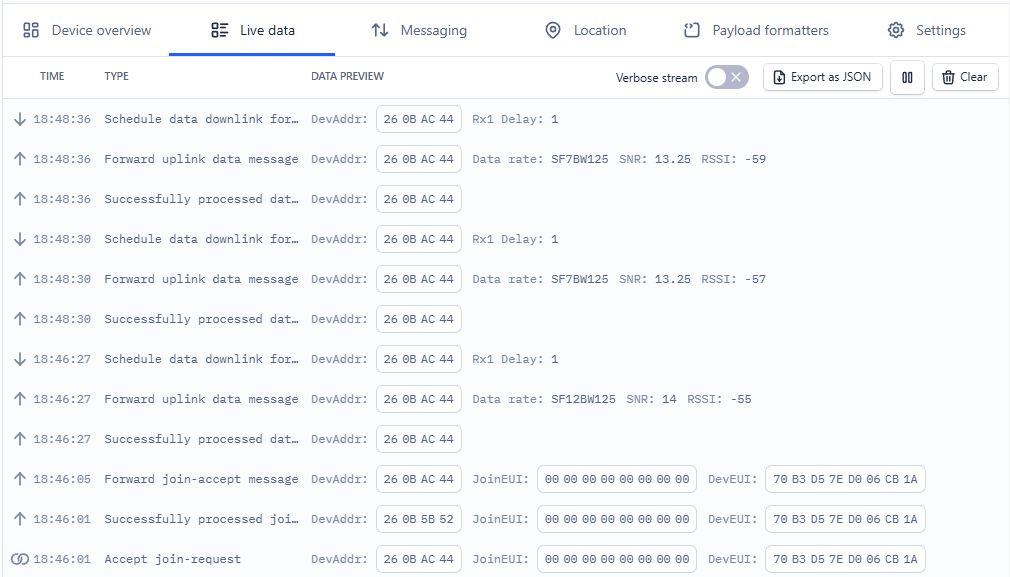
- In TTS -> Applications -> YourAppName -> YourEndDeviceName -> Live data you should see this:
Class C
- In the Arduino IDE File -> Examples -> SeeeduinoLoRaWan-x.x.x -> open 868_OTAA_Class_C_Hello_LoRa
- In program replace APP_EUI, DEV_EUI and APP_KEY with keys in TTS. Keys are in TTS -> Applications -> YourAppName -> YourEndDeviceName -> Activation information.
- Connect Seeeduino LoRaWAN using micro USB cable to your computer.
- Choose the appropriate COM port which is used for communication with Seeeduino.

- In Arduino IDE click on Upload button to upload program to your Seeeduino LoRaWAN.
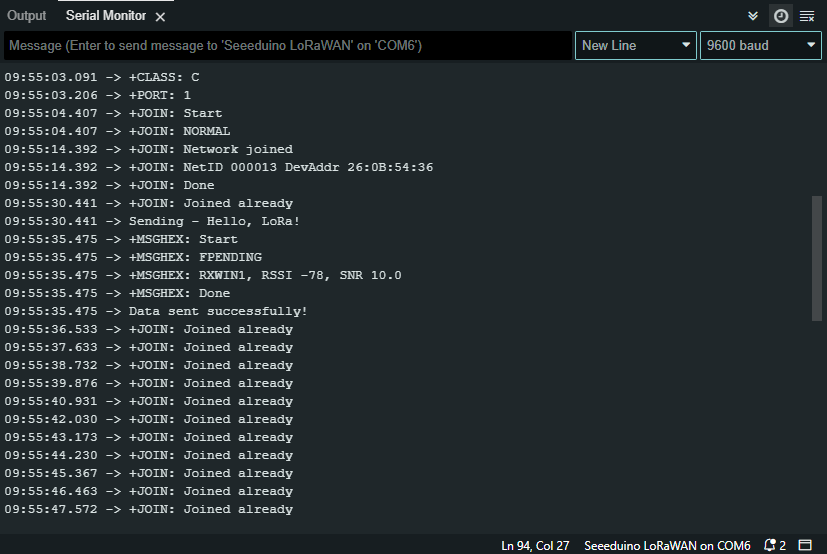
- In Arduino IDE click on Serial Monitor button and you should every +-300 seconds see “Sending – Hello, LoRa!”:
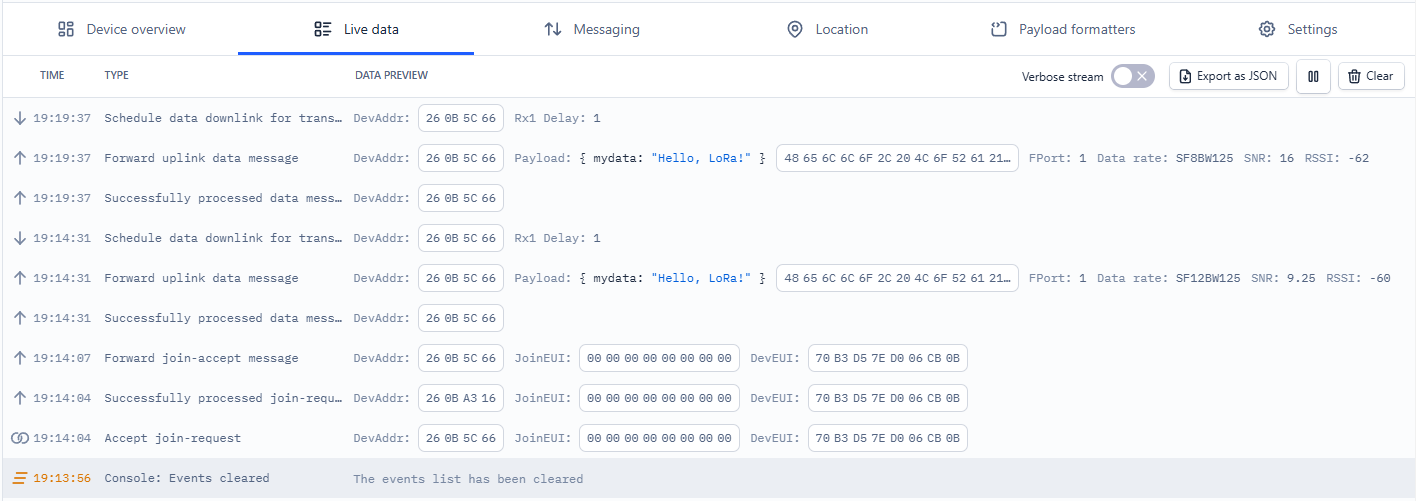
- In TTS -> Applications -> YourAppName -> YourEndDeviceName -> Live data you should see this:

Low Power – Sending “Hello LoRa!” to TTS
Class A
- In the Arduino IDE File -> Examples -> SeeeduinoLoRaWan-x.x.x -> open 868_OTAA_Class_A_Hello_LoRa_Low_Power
- In program replace APP_EUI, DEV_EUI and APP_KEY with keys in TTS. Keys are in TTS -> Applications -> YourAppName -> YourEndDeviceName -> Activation information.
- In the Arduino IDE Library Manager search RTCZero by Arduino and install it.
- Connect Seeeduino LoRaWAN using micro USB cable to your computer.
- Choose the appropriate COM port which is used for communication with Seeeduino.

- In Arduino IDE click on Upload button to upload program to your Seeeduino LoRaWAN.
- In Arduino IDE click on Serial Monitor button and you should every +-300 seconds see “Sending – Hello, LoRa!”:
Sending values to TTS, downlink reception and Cayenne LPP decoding
- Tutorial that describes how to send downlinks to end devices in individual classes (A, B, and C) is described in the article: 433 & 868 MHz Seeeduino – Downlink reception and Cayenne LPP decoding
Activation By Personalization (ABP)
Add Seeeduino LoRaWAN into The Things Stack
- Create an account on The Things Network if you don’t have one.
- Login on The Things Network.
- Click on your username and choose Console.
- Select a network cluster.
Add application
- Go to applications.
- Click on button + Add application.
- Write something into Application ID.
- Click on button Create application.
Add end device
- In your application click on button + Register end device.
- Input Method – Choose Enter end device specifics manually.
- Frequency plan – Europe 863-870 MHz (SF9 for RX2 – recommended)
- LoRaWAN version – LoRaWAN Specification 1.0.3
- Click on Show advanced activation, LoRaWAN class and cluster settings
- Activation mode – Activation by personalization (ABP)
Class A
- Additional LoRaWAN class capabilities – None (class A only)
- Deselect – Use network’s default MAC settings
- Rx1 data rate offset = 0
- Rx1 delay = 1
- Resets frame counters – Enabled
- Rx2 data rate = 3
- Rx2 frequency = 869,525 MHz
Class B
- Additional LoRaWAN class capabilities – Class B (Beaconing)
- Rx1 data rate offset = 0
- Rx1 delay = 1
- Resets frame counters – Enabled
- Class B timeout – Set to value less than the time between two ping slots (ping slot periodicity) (for example every 15 seconds)
- Ping slot periodicity – The amount of time between two receive windows (ping slots) (for example every 16 seconds)
- Beacon frequency – 869,525 MHz
- Ping slot frequency – 869,525 MHz
- Rx2 data rate = 3
- Rx2 frequency = 869,525 MHz
Class C
- Additional LoRaWAN class capabilities – Class C (Continuous)
- Deselect – Use network’s default MAC settings
- Rx1 data rate offset = 0
- Rx1 delay = 1
- Resets frame counters – Enabled
- Class C timeout – 300 seconds
- Rx2 data rate = 3
- Rx2 frequency = 869,525 MHz
- Add entry = 868100000
- Add entry = 868300000
- Add entry = 868500000
- Add entry = 867100000
- Add entry = 867300000
- Add entry = 867500000
- Add entry = 867700000
- Add entry = 867900000
- DevEUI – Generate
- Device address – Generate
- NwkSKey – Generate
- AppSKey – Generate
- End device ID – here you can name your device
- After registration – View registered end device
- Click on button Register end device
- Click on Settings
- Network layer – Expand
- Click on Advanced MAC settings
- Desired Rx1 delay = 1
- Adaptive data rate (ADR) – Dynamic mode
- Click on button Save changes
Sending “Hello LoRa!” to TTS
- In TTS -> Applications -> YourAppName -> YourEndDeviceName -> Payload formatters -> Uplink change Formatter type to Custom Javascript formatter and to Formatter code copy and paste code bellow:
function Decoder(bytes, port) {
   return {
          mydata: String.fromCharCode.apply(null, bytes) // Decode plain text
   };
}
- Save changes
Class A
- In the Arduino IDE File -> Examples -> SeeeduinoLoRaWan-x.x.x -> open 868_ABP_Class_A_Hello_LoRa
- In program replace NWKSKEY, APPSKEY and DEVADDR with keys of your end device registred in TTS. Keys are in TTS -> Applications -> YourAppName -> YourEndDeviceName -> Device overview -> Session information.
- Connect Seeeduino LoRaWAN using micro USB cable to your computer.
- Choose the appropriate COM port which is used for communication with Seeeduino.

- In Arduino IDE click on Upload button to upload program to your Seeeduino LoRaWAN.
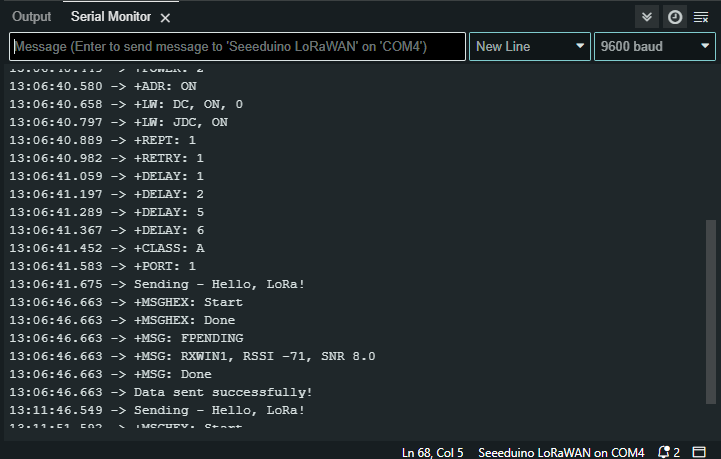
- In Arduino IDE click on Serial Monitor button and you should every +-300 seconds see “Sending – Hello, LoRa!”:
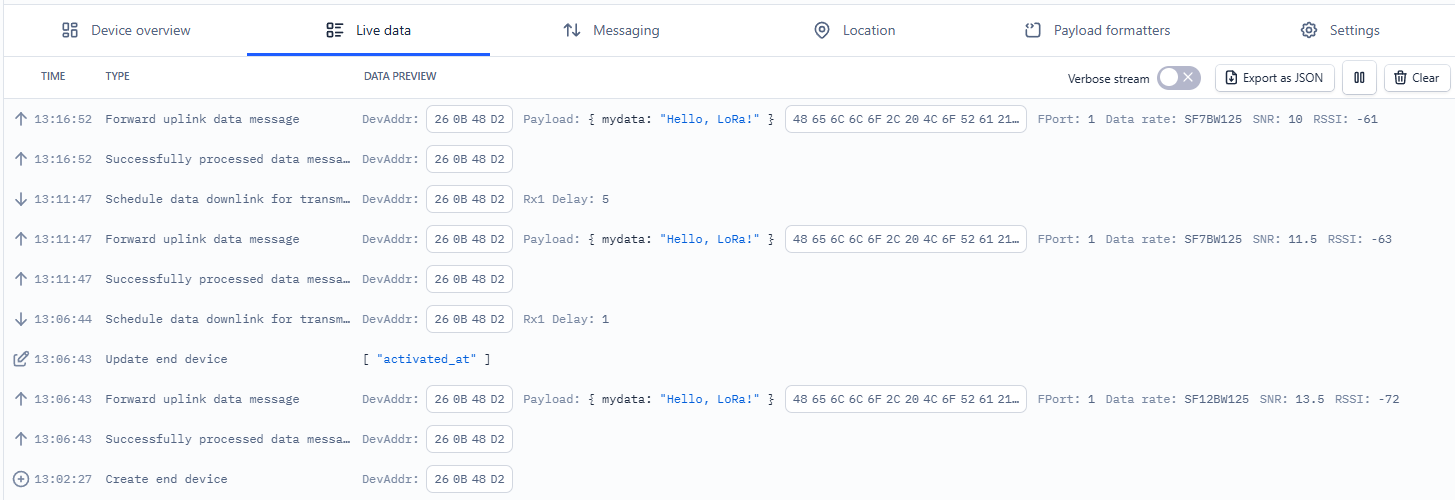
- In TTS -> Applications -> YourAppName -> YourEndDeviceName -> Live data you should see this:
Low Power – Sending “Hello LoRa!” to TTS
Class A
- In the Arduino IDE File -> Examples -> SeeeduinoLoRaWan-x.x.x -> open 868_ABP_Class_A_Hello_LoRa_Low_Power
- In program replace NWKSKEY, APPSKEY and DEVADDR with keys of your end device registred in TTS. Keys are in TTS -> Applications -> YourAppName -> YourEndDeviceName -> Device overview -> Session information.
- In the Arduino IDE Library Manager search RTCZero by Arduino and install it.
- Connect Seeeduino LoRaWAN using micro USB cable to your computer.
- Choose the appropriate COM port which is used for communication with Seeeduino.

- In Arduino IDE click on Upload button to upload program to your Seeeduino LoRaWAN.
- In Arduino IDE click on Serial Monitor button and you should every +-300 seconds see “Sending – Hello, LoRa!”:

