
| TTN version: | TTNv3 |
| Frequency: | Europe 863-870 MHz (SF9 for RX2 – recommended) |
| Using Docker: | No |
| Last updated: | October 13, 2023 |
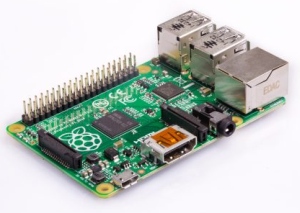
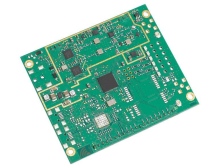
Used HW: Raspberry-Pi (version 2, 3 or 4) & iC880a SPI
Step 1: Install latest Raspberry Pi OS (choose “lite” version).
Step 2: Customise OS
Run RPI, login as default user “pi” (default passwd “raspberry”) and customise OS:
Step 2.1: update OS:
# rpi-update
# apt dist-upgrade
# apt update
# rpi-update
Step 2.2: delete default user PI:
# adduser <new-user>
# deluser pi
Step 2.3: install Persistent IPtables:
# apt-get install iptables-persistent
# vi /etc/iptables/rules.v4
This is an example of file rules.v4:
*filter
:INPUT DROP [0:0]
:FORWARD ACCEPT [0:0]
:OUTPUT ACCEPT [0:0]
-A INPUT -i lo -j ACCEPT
-A INPUT -p tcp --dport 22 -m state --state NEW -j ACCEPT
-A INPUT -j ACCEPT -m state --state ESTABLISHED,RELATED
COMMIT
Step 2.4: set NTP time:
- Go to http://support.ntp.org/bin/view/Servers/NTPPoolServers and click the host name corresponding to your area. Assuming the area is North America, the servers are:
  server 0.north-america.pool.ntp.org
  server 1.north-america.pool.ntp.org
  server 2.north-america.pool.ntp.org
  server 3.north-america.pool.ntp.org
- Open /etc/ntp.conf in a text editor. If you use the nano editor, run sudo nano /etc/ntp.conf
- You should see a list of servers similar to the one below, replace the servers with the ones from step 1::
 server 0.cz.pool.ntp.org iburst
 server 1.cz.pool.ntp.org iburst
 server 2.cz.pool.ntp.org iburst
 server 3.cz.pool.ntp.org iburst
- Comment out (by adding a # in front of the line) the following two lines:
  restrict 127.0.0.1
  restrict ::1
- Save the file and exit
- Set the correct time zone by running # sudo cp /usr/share/zoneinfo/US/Pacific /etc/localtime. Replace US/Pacific with your time zone. If you are not sure about the possible values, look in /usr/share/zoneinfo
- Restart the ntp server: sudo /etc/init.d/ntp restart
- Run
datein a terminal - If the time is not correct, you might have to force update it. This is because, by default,
ntpwill not sync if the difference between the system time and the real-time is greater that 1000 seconds. Runsudo ntpd -gqand the restartntp
Step 2.5: turn off wifi (if you use RPI3 (and later) and if don’t need it):
# iwconfig wlan0 txpower off (if needed tun on: # iwconfig wlan0 txpower auto)
check status:
# rfkill list all
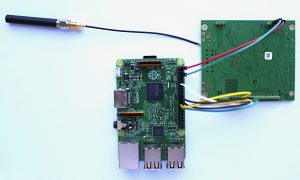
Step 3: Putting it all together
Connect the jumper wires between the two boards using the following table:
We’re now ready to power up and start configuring our gateway!
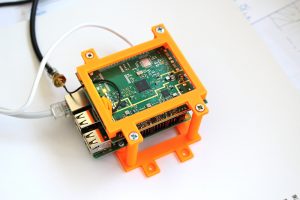
If you have a 3D printer, you can use a holder to mount both boards together. Download all *.stl and *.gcode files.
Step 4: Setting up the Lora Basic Station software
- Use
raspi-configutility to enable SPI ([3] Interfacing options -> P4 SPI – automatic loading of the SPI kernel module) and also expand the filesystem ([7] Advanced options -> A1 Expand filesystem). If you use the GPS module’s TX and RX lines connected to the serial port (the serial port is normally enabled as a console) Disable (P6) shell messages on the serial connection and leave the serial port hardware enabled. - Reboot (it will ask on exit, but you can do it manually with
sudo reboot) - Configure locales and time zone:
$ sudo dpkg-reconfigure locales
$ sudo dpkg-reconfigure tzdata
- Make sure you have an updated installation and install
git:$ sudo apt-get install git
- If PRI3 or 4: Configure the wifi credentials (check here for additional details)
# nano /etc/wpa_supplicant/wpa_supplicant.conf
And add the following block at the end of the file, replacing SSID and password to match your network:
	network={
	    ssid="The_SSID_of_your_wifi"
	    psk="Your_wifi_password"
	}
- Clone the installer and start the installation
$ mkdir /opt/ttn-station
$ cd /opt/ttn-station
$ git clone https://github.com/lorabasics/basicstation.git
$ cd basicstation
$ make platform=rpi variant=std
- Configuration
Create a file called tc.uri and fill it with the server name. Packet transport with the The Things Network V3 LNS goes on port 8887. Currently the following LNS exist:- Europe 1: eu1.cloud.thethings.network
- North America 1: nam1.cloud.thethings.network
- Australia 1: au1.cloud.thethings.network
$ cd /opt/ttn-station
$ nano tc.uri
and for EU place:
wss://eu1.cloud.thethings.network:8887
Next we need to establish a secure connection. This involves copying the root certificate (expires Jun 2035) to a file called tc.trust.
$ nano tc.trust
$ curl https://letsencrypt.org/certs/isrgrootx1.pem.txt -k -o tc.trust
Make a station configuration file:
$ nano station.conf
and fill it with:
{

   "radio_conf": {                  /* Actual channel plan is controlled by the server */
       "lorawan_public": true,      /* is default */
       "clksrc": 1,                 /* radio_1 provides clock to concentrator */
       "device": "/dev/spidev0.0",  /* default SPI device is platform specific */
       "pps": true,
       "radio_0": {
           /* freq/enable provided by LNS - only hardware-specific settings are listed here */
           "type": "SX1257",
           "rssi_offset": -166.0,
           "tx_enable": true
       },
       "radio_1": {
           "type": "SX1257",
           "rssi_offset": -166.0,
           "tx_enable": false
       }
       /* chan_multiSF_X, chan_Lora_std, chan_FSK provided by LNS */
   },
   "station_conf": {
     "log_file":    "stderr",
     "log_level":   "DEBUG",
     "log_size":    10e6,
     "log_rotate":  3
   }
}
- Reset
The SX1301 chip has to be reset after power-up. However, this initial reset of the SX1301 is not performed by LBS. We have to do this externally and use gpioset that comes with the gpiod*. We have connected an iC880 reset pin (13) to GPIO17 of the R-Pi.
Install the gpiod package:
$ apt install gpiod
$ nano reset_gw.sh
#!/bin/sh
#gpioset --mode=time --usec=500 pinctrl-bcm2835 17=1
#gpioset --mode=time --usec=500 pinctrl-bcm2835 17=0
*in legacy OS (e.g. Jessie) may not gpiod available. Use old way work with GPIO:
SX1301_RESET_BCM_PIN=17
echo "$SX1301_RESET_BCM_PIN"  > /sys/class/gpio/export
echo "out" > /sys/class/gpio/gpio$SX1301_RESET_BCM_PIN/direction
echo "0"   > /sys/class/gpio/gpio$SX1301_RESET_BCM_PIN/value
sleep 0.1
echo "1"   > /sys/class/gpio/gpio$SX1301_RESET_BCM_PIN/value
sleep 0.1
echo "0"   > /sys/class/gpio/gpio$SX1301_RESET_BCM_PIN/value
sleep 0.1
echo "$SX1301_RESET_BCM_PIN"  > /sys/class/gpio/unexport
And make the script an executable:
$ chmod 755 reset_gw.sh
Step 5: Registering the Gateway on The Things Network

First run
$ /opt/ttn-station/basicstation/build-rpi-std/bin/station --radio-init=/opt/ttn-station/reset_gw.sh
The gateway/station’s EUI is made up from the Raspberry Pi’s MAC address and should be shown in the first couple of lines of output when the station starts – for example:
[SYS:INFO] proto EUI : 0:b827:ebxxxxxxx
Log into the console of the cluster you intend to register with and click “Go to gateways“

Then click Add Gateway. The following dialog should appear:
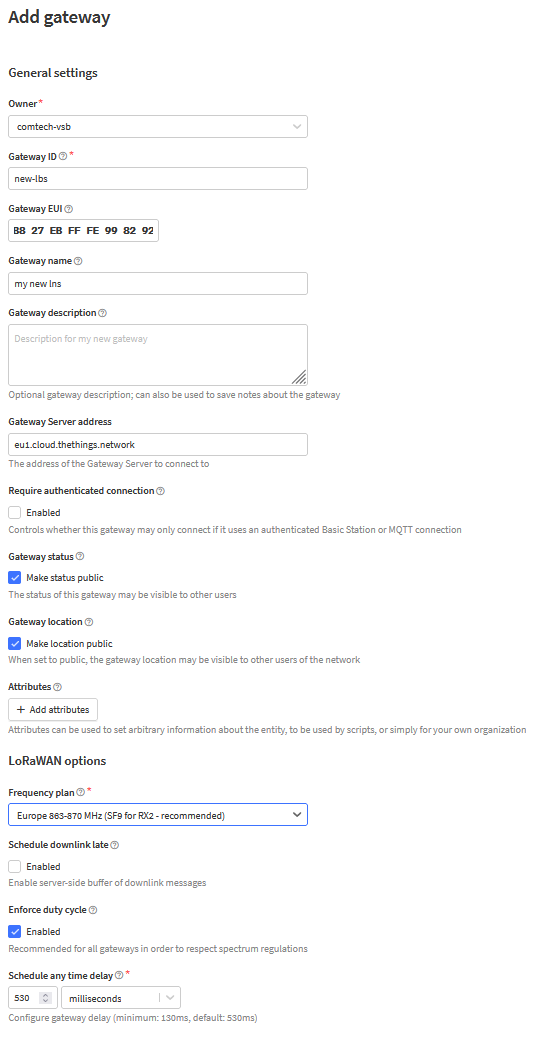
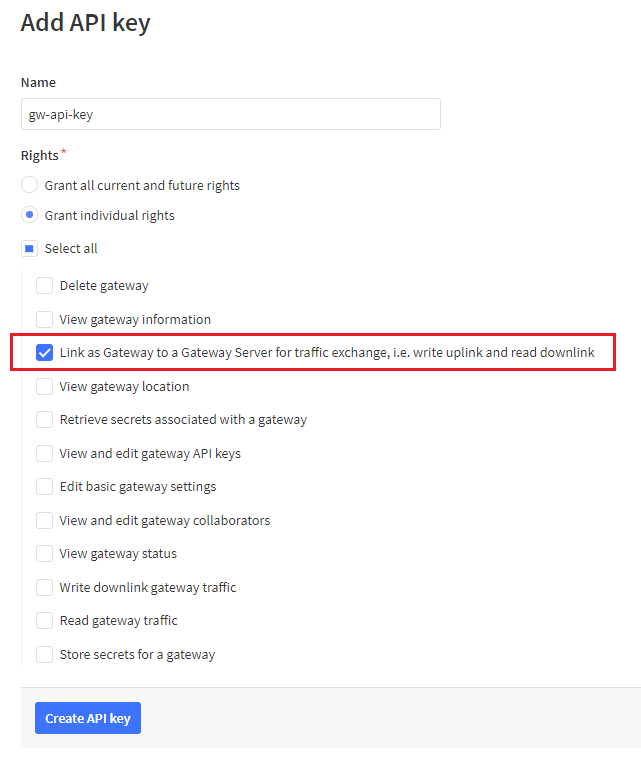
You need to add an API key to authorise your gateway:

Give your API key a name and change the rights to grant individual rights to “link as Gateway to a Gateway Server for traffic exchange, i.e. write uplink and read downlink” as per the example below. Then click Create API key to create it.
Now you will be given a one time opportunity to copy the key. Click the copy button (highlighted below by the red box) and …
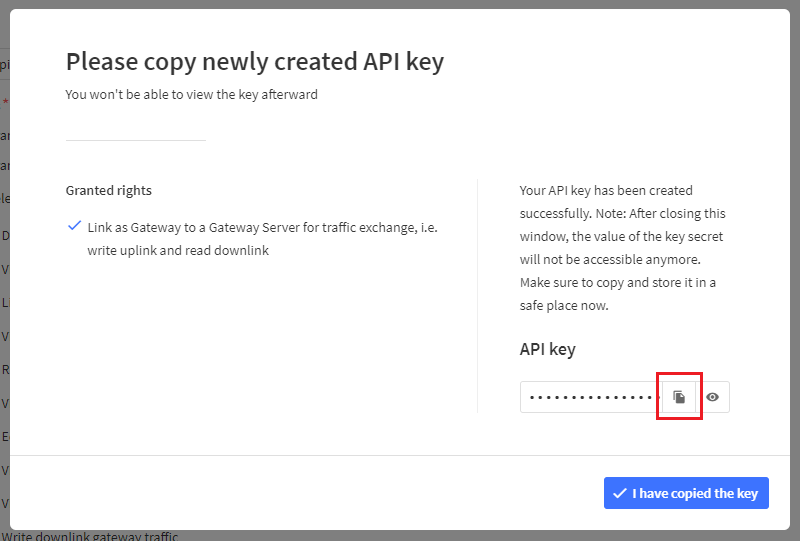
$ export LNS_KEY="<API-KEY>"
$ echo "Authorization: Bearer $LNS_KEY" | perl -p -e 's/\r\n|\n|\r/\r\n/g' > tc.key
Now start/restart station and your gateway should successfully register. Make a simple bash script to run LBN:
$ nano start.sh
/opt/ttn-station/basicstation/build-rpi-std/bin/station --radio-init=/opt/ttn-station/reset_gw.sh --home=/opt/ttn-station --log-file=station.log  --daemon
$ chmod +x start.sh
$ /opt/ttn-station/start.sh
Starting at boot
$ nano /etc/systemd/system/ttn-station.service

[Unit]
Description=The Things Network Station

[Service]
Type=simple
RemainAfterExit=yes
WorkingDirectory=/opt/ttn-station/
ExecStart=/opt/ttn-station/start.sh
TimeoutStartSec=0
SyslogIdentifier=ttn-station
Restart=on-failure
RestartSec=5

[Install]
WantedBy=multi-user.target

$ systemctl daemon-reload
$ systemctl enable ttn-station.service
$ systemctl start ttn-station.service
Step 6: RPI backup img:
# dd if=/dev/mmcblk0 | gzip -1 - | ssh user@backup-server dd of=image.gz